|
I recently discovered a small, but lovely community called STEMN, the Science, Technology, Engineering, and Math Network. It is a collaboration tool for people all over the world to contribute to space projects. People post projects and questions and get feedback. and answers. I have seen a lot of student CubeSat projects there, and while students (as expected), have a lot to learn, I have noticed that many of them struggle more in the area of thermal analysis. That is why I made a tutorial to help students understand the thermal environment, perform basic analysis, and design for passive thermal control.
1 Comment
Rumors have been flying about on twitter that the NASA academy program has ended, and 2015 was the last year. This obituary may be premature, but it seems a good at time as any to reflect on a program which has captured hearts and united so many across the space industry. As a two-time attendee it saddens me to hear this program is ending, because the times that I had there were some of the most fun I had in my life. I loved the experience, and will look back on it with fond memories. The other students I met quickly became more than colleagues, but friends for life. Wherever I go in the space industry, I meet other alumni, and share the bond of our common experience. It is even the place where I met my soon-to-be wife! While I and many others loved the experience, we should reflect on how the program performed. The goal of the program was to: Identify and recruit the future leaders of the space exploration community, to introduce them to the key aspects of the industry, to provide them with critical training, and to build an ever-expanding network of these future leaders, so that these young scientists and engineers are prepared to assume the highest responsibilities of a career dedicated to leadership in space exploration. The Academy was incredibly successful at introducing us to parts of the industry and helping us network with current and future leaders in the space industry. If the NASA academy was intended, in any way, to groom students for careers at NASA, I do not think it was successful. And while not part of their mission statement, the encouragement we received from our mentors to pursue NASA careers indicated that was a major component. Of the 12 Robotics Academy students in 2010, zero of us went on to a career at NASA. In fact, only one of us is currently working In the space industry, me. Of the three NASA academy programs at Marshall, representing 35 people, I currently know of only one who is, working full-time on a NASA program (as a contractor). The NASA academy recruited the most ambitious, talented students, and when put together in our teams we were capable of great things. We also had a lot of fun. In fact, we had so much fun that the science and engineering challenges we were capable of accomplishing were secondary goals. Of the 10 weeks which I spent at the NASA robotics academy at Marshall Spaceflight Center, only half the days were allotted for working. While having fun and experiencing tours of other NASA centers was enriching, the act of pushing the frontier takes a lot of hard work. We, young ambitious engineers that we were (and for many of us, still are) wanted a challenge to make real contributions, and experience the fulfilling rewards and excitement that comes with that. We were told we were the best and brightest, but didn't have the opportunities to prove it. For the precious time we did work on our internship projects, we found ourselves limited, not by our skills or creativity, but by resource availability in computers, software, budget, and union rules. I was forced to use my personal computer both years, because our computers were either non-existent or came without any software. There was no official budget for purchasing parts so at the 2010 academy all of the robots we did make were paid for by our mentor. We were not allowed operate any power tools with which to construct robots. In my 2011 Robotics Academy experience at Ames, which did focus more time on the work, was disorganized, and its leadership was unfamiliar with the engineering process, especially for space vehicles. If the NASA academy was to be a recruiting tool, it should have focused on making a challenging, rewarding, hard, fun work experience, not trying to be a summer camp. The best and the brightest seek the biggest challenges to do the most good. If anyone ever revives the NASA academy they would do well to remember that. Update 2016-01-29:
I have seen confirmation that the NASA academy at Ames has been cancelled, and so has the Robotics and Propulsion Academy at Marshall, leaving only one NASA academy at Marshall this year and one at Glenn. While not completely out, it would be a good time to evaluate why it exists, and what the students who come to it are looking for.
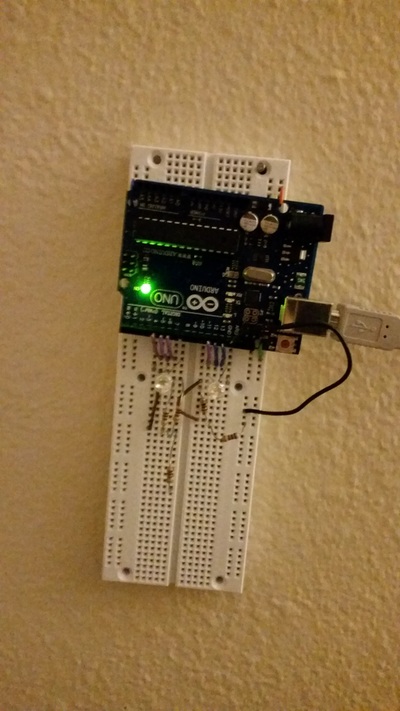
Left: First prototype. Using the arduino clock only, powering a single RGB LED
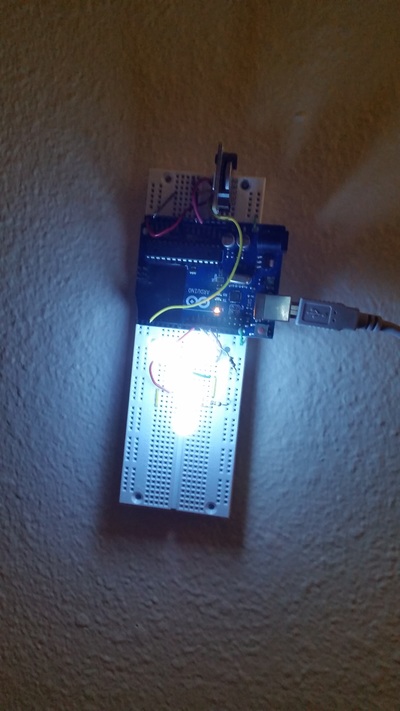
Right: As it is today, real time clock module (top) and 5 powerful white LEDs
Being from Fairbanks, Alaska, I am used to the fickleness of the sun from season to season, and have coped with many mornings of waking up when it was pitch black outside. Seattle gets a more daylight in the winter months than where I grew up, but the rain and clouds doesn't make it much better.
I wanted a light alarm clock to help me get out of bed on those dark dreary mornings. I had looked for a luminous alarm clock online, but didn't like any of them. They were all large, counter-top clock-radio devices with big LCD screens and features I didn't want, without the ability to be programmed on a clever schedule. I decided that it was a simple enough thing I could make on my own. This was a small project, and also one of the few I have ever completed in a single weekend. I had considered using an internet-connected spark core for this project, but I had another use in mind for my one and the power output is rather low. Being internet connected could have made time-keeping much easier, but chose to use an Arduino Uno because I had a couple of them laying around and knew it would be able to pack enough of a punch to light up many LEDs. Friday night I quickly prototyped the device on a breadboard with an RGB LED I had in my stock, and just using the Arduino's timer, I was pleasantly surprised to see that it was on the following morning! An arduino's built-in clock is not adequate for time keeping and would become wildly inaccurate over a few weeks. I upgraded to the DS1307 real-time clock with a coin-cell battery backup. It tracks time and communicates to the arduino over an I2C bus. If you happen to be using that same device, I discovered that Vbat and Ground do need to be shorted together. Otherwise, the clock will report a time, it just won't increment it. I soldered on a 90 degree header strip and plugged it into my breadboard vertically. The LED's are in a 10mm package and run on 3.2 V with 20 mA of forward current. I chose bright white to help me wake up faster. I bought 9 but I stopped wiring after 5, and it seems to be enough to get me out of bed. I choose to keep them on from 7 am to 9 pm, to give the bedroom a little more light during the day. After a frustrating few hours of software debugging I concluded that the battery backup for the real-time clock was not functional. I haven't dug very deep yet, but in the spirit of rapid prototyping I wanted to sprint to what would be good enough for the next morning, and make fixes as needed later. I programmed the RTC with the correct time when it was plugged in, and it would keep time from there. This will be just fine unless power is interrupted. In the Seattle area, with it's abundant hydroelectric power, outages are very rare. Code:
The debugging statements and planned features are left in. I found the serial output commands to be very useful when debugging. I borrowed the bulk of this code from another tutorial, the source of which I cannot find right now.
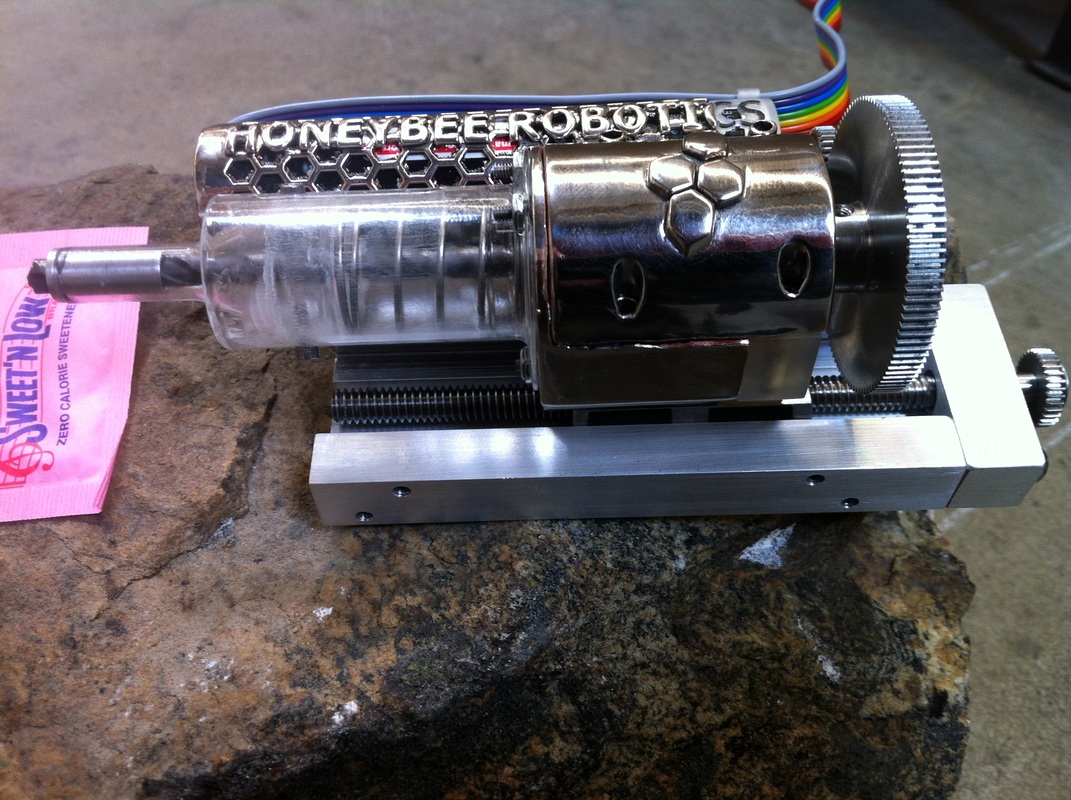
I Interned at the exploration division of Honeybee Robotics in Pasadena, California during the summer and fall of 2012. The exploration division of Honeybee Robotics specializes in the development of drilling and sampling systems to be used on the Moon, Mars, or asteroids. The highly experienced team at Honeybee has had three dust removal or sampling tools sent to the surface of Mars and one sample processing system. It was a distinctly different experience from my NASA internships beginning on day one. There was no lengthy IT or safety training I was shown my computer, given a list of requirements for my first drill, and got to work. It was a refreshing change from my previous experiences. Requirements: The goal was to develop a drill which could be deployed from one of the small payload containers embedded in the wheels of the Jet Propulsion Laboratory (NASA/JPL) Axel prototype Mars rover and drill into the side of a cliff. These are the basic requirements given when I began my internship:
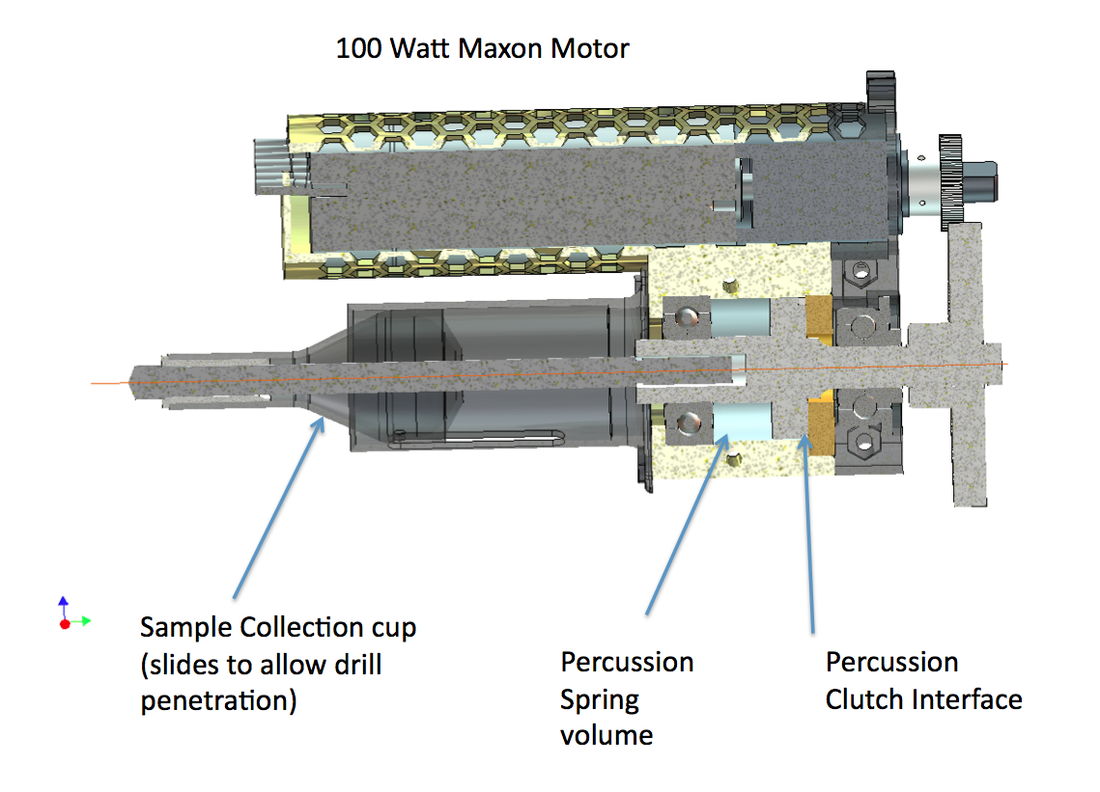
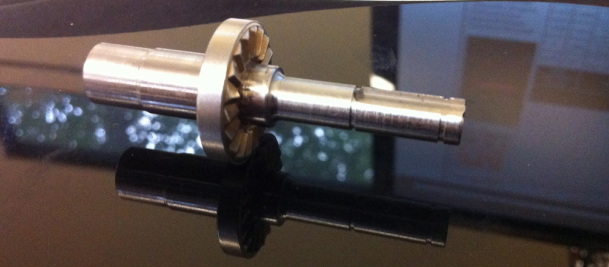
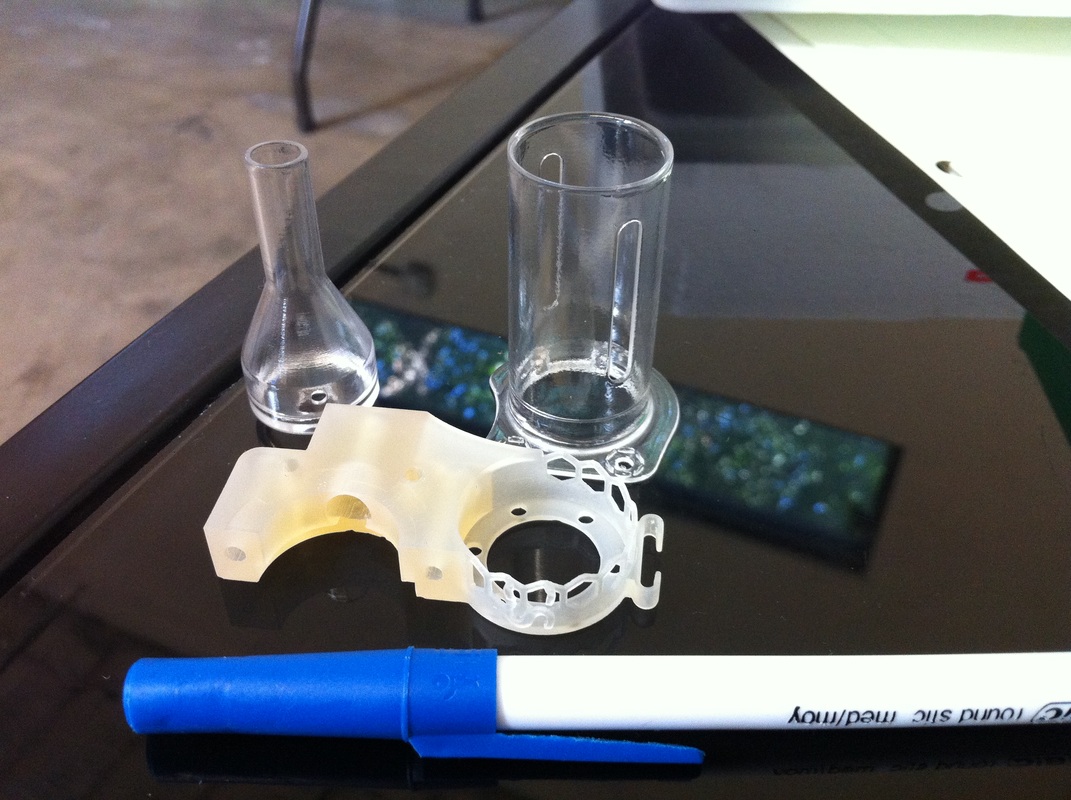
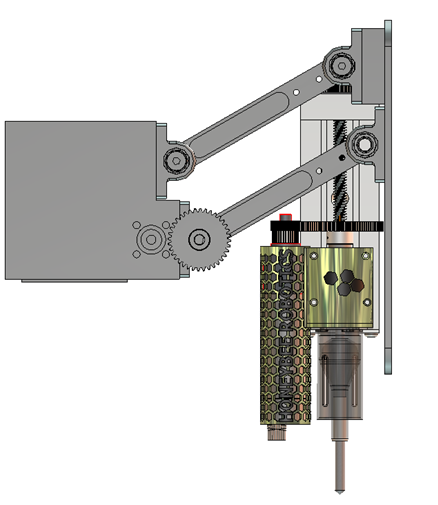
Design: The drill bit I needed to use had already been selected, a Relton Groo-V 1/8 in bit, which is very effective drilling into hard rocks, especially when combined with percussion. Most of us are familiar with rotary drilling, it is what is commonly used for drilling wood, metal, and other materials. Rocks are extremely hard and brittle. Hammering the drill bit into the hole introduces cracks in the rock, making the material much easier to cut. This results in significantly faster penetration rates, lower energy consumption, and a reduction in bit wear. The drill bit is much tougher than the rock, even though it may not be much harder. This is important because some rocks (such as saddleback basalt) have a compressive strength of 280 MPa, significantly stronger than even the best concrete. Percussion is even more important for drills going to other planets, because water cooling isn't an option. In the design of the drill, it was decided to use off the shelf parts wherever we could, so a much larger Hilti hand-held rock drill was disassembled to see what parts might be useful. We chose to reuse the percussion clutch components because of the difficulty that it would take to manufacture new ones. The percussion clutch components in the Hilti drill were made out of hardened steel and also had a coating on them, making them very strong and abrasion resistant so the pieces could be slammed against each other many times. Recycling these components saved money and time. Integrating these COTS components added some difficulty to the drill structure. The stationary part of the percussion mechanism (not shown) has a lot of sharp edges where it was fixed into the drill. The Hilti drill used an injection molded plastic piece to retain that part. Modifications to the percussion clutch would have been very difficult due to the small size and hardness, and it also be difficult to make a negative of that shape in aluminum to secure the part. This led me to 3D print the clutch fixture out of plastic on an SLA machine. While in the process of designing the drill components I concluded that since I needed one small part of small drill 3-D printed, I may as well print the whole thing. For the drill rotation and percussion I chose a 100 Watt Maxon motor with a diameter of 22 mm, and a 10 mm Maxon motor for advancing the stroke. The drill motor was integrated to the 3D printed chassis and the stroke motor (Z-axis) was mounted to the back of the linear slide. The drill motor had an integrated 2 stage gearbox but still needed an additional reduction of 3:1 for the output. It was a packaging challenge to fit the gears in such a small space but I was able to make it fit, and the flexibility of 3D printing to fabricate any geometry helped. The sample was collected inside another plastic container, shown above, and was extracted from the drill by rotating in the other direction to deposit it. The percussion worked in both directions and was also a great help in removing the sample.
Results The final product was delivered to the Jet Propulsion Laboratory in 3 months. During field trials, it was proven capable of drilling through multiple rock types and collecting samples from horizontal and vertical surfaces. Honeybee Robotics had never made a smaller drill, nor one that was as inexpensive as this one, the project was far under budget. Lessons Learned While the project was a success, it did not come without some lessons that were learned the hard way. Recycling components from other products can be great, but you don't always know what you are getting. Our machinist found that the rotary percussive mechanism was hardened not just on the percussive surface, but almost everywhere. As a result one of the tapped holes had to be made with an EDM. Luckily, this operation was only $75. In the first picture you can see a bright nickel coating on the housing of the drill. Although this certainly added some style, I regret doing it and wish I had skipped it. The plating mask was complicated and the vendor was not able to do it. The vendor should have refused, but attempted anyway and added a month long delay to getting my parts. The plating build-up was much thicker than it should have been and the part required light machining so the motor could fit. As a result the vendor learned a lesson as and stopped offering that service with masks. I learned not to make intricate masks and get a sanity check before trusting if a vendor can perform as advertised, especially when it is through a subcontract. Finally, I learned to do more planning when taking on a project, and resist the urge to begin modeling and engineering right away. After falling in love with the idea of having my own factory on my desk, I finally got a 3-D printer. The significance of having a 3-D printer is not that I simply have another toy. It isn't even that I have a new tool that will allow me to make things that I can dream up or that I will be able to gain experience in design tolerance and go from ideation to prototype. I think the real significance of my 3-D printer is that I know I am joining a movement that will have a hug impact on our economy and culture, and will probably be as big as the computer revolution. The ability for individuals to manufacture their own objects and products in their own home will drastically change consumerism and will probably have a big change on intellectual property rights when consumers have the ability to make physical objects. I chose to get a Makerbot Thing-o-Matic because the company has heritage in building low-cost 3-D printers and because they are a for-profit company so I knew the product would be supported. I could have gotten a RepRap for significantly cheaper but decided against it just because of the challenges that I have faced in the past when working with open-source projects. Another cool feature about the Thing-o-Matic is that it comes with an automated build platform, which allows me to print many objects in a row without my interference. I could leave it home printing all day while I am at school. It will really let me get creative in making things, like last-minute parts for my capstone project, camera mounts for rockets, actual rockets, small design projects, and of course the rapidly growing collection of things that already reside on Thingiverse.com Slide-show below showing the build process (in reverse order for some reason). As an early adopter may expect, the instructions for assembling the makerbot were not always good as one might like. The instructions were entirely online, which is good because a paper copy would probably weigh a significant amount, and I was content to just read them off of my screen. As the Thing-o-matic has been revised and changed piece-by-piece, one could tell which instructions had been written for earlier models by their clarity. The newer instructions were quite helpful with lots of pictures, but the old ones occasionally left us scratching our heads - though usually not for long. Luckily there were user posted comments for every page of the instruction manual, and those pages were well organized.
The instructions claimed that it would take about 16-20 hours to complete. Although I did not time myself, I believe that it took longer than that for myself. Ellen Farber assisted for the entire first half of the project, and then I continued on my own. I found during the final stages that it became easy to make mistakes during assembly, and there were a few times that I had to take apart major sections. I had the body panels accidentally reversed a few times, before finally coming to a configuration that works. It was magical when I first turned it on and a thin string of semi-molten plastic emerged from the extruder. The most challenging and the most frustrating part of the entire process was the calibration of the machine after it was completely built. This took the most amount of time. The bug that kept getting me was a 'slipping' of the Y-axis during some builds. Eventually, I discovered was because I did not have stepper motor types I thought I had, and the stepped motor controllers had not been adjusted to the right settings. The next challenge was spool management. This is a serious issue until you can print the parts that are needed to keep the spool rolling and in the right place. My biggest challenge at the moment is dealing with warping on the build surface. As it turns out the Automated Build Platform results in a significantly reduced quality of the print in exchange for automation. The belts also wear out over time, making things worse. But the absolute worst thing about the ABP has to be that you cannot level it. It is front heavy because of the DC gear-motor, so the little bit of slop in the rods throws the whole thing front heavy. I am trying to weigh my options, which are 1) Buy the heated build platform in addition to the ABP, 2) Get a titanium belt for my prints (about the same price) or figure out something else. |
Lars OsborneBS Mechanical Eng Categories
All
|

 RSS Feed
